
How to Safely Jump-Start a Car With a Dead Battery
Jump-starting a car with a dead battery is a simple process when done correctly, but safety is critical to prevent injury or vehicle damage. This guide provides step-by-step instructions for using jumper cables or a portable jump starter, along with essential safety precautions and post-jump-start actions.
Items Needed for a Jump-Start
Ensure you have the following before starting:
- Jumper Cables: Insulated, 10–20 feet, heavy-gauge for better reach and connection.
- Donor Vehicle or Portable Jump Starter: A working car with a 12-volt battery or a charged portable jump starter.
- Safety Gear: Work gloves (rubber, nitrile, or leather) and safety glasses to protect against sparks or acid.
- Cleaning Supplies (Optional): Wire brush and rag to clean corroded battery terminals.
- Emergency Extras (Optional): Flashlight for nighttime and vehicle owner’s manual for battery location or specific instructions.
Safety Precautions
Car batteries emit flammable hydrogen gas and high currents, posing risks of explosion or electrical damage. Follow these precautions:
- Safe Positioning: Park vehicles close but not touching, away from traffic, with parking brakes engaged.
- Power Off: Turn off ignitions, remove keys, and disable all accessories (lights, radio, etc.) in both vehicles.
- Inspect Battery: Do not jump-start if the battery is cracked, leaking, bulging, frozen, or smells of sulfur, as it may be hazardous.
- Protect Yourself: Wear gloves and safety glasses; remove metal jewelry to prevent shorts or burns.
- Avoid Ignition Sources: No smoking or open flames near the battery due to explosive gas risks.
- Correct Connections: Match 12-volt systems and connect positive (+) to positive, negative (–) to negative to avoid sparks or system damage.
- Handle Cables Carefully: Prevent clamps from touching each other or metal surfaces until properly connected.
- Follow Sequence: Connect and disconnect cables in the specified order to minimize spark risks near the battery.
- Check Manual: Consult the owner’s manual for model-specific instructions or dedicated jump-start terminals.
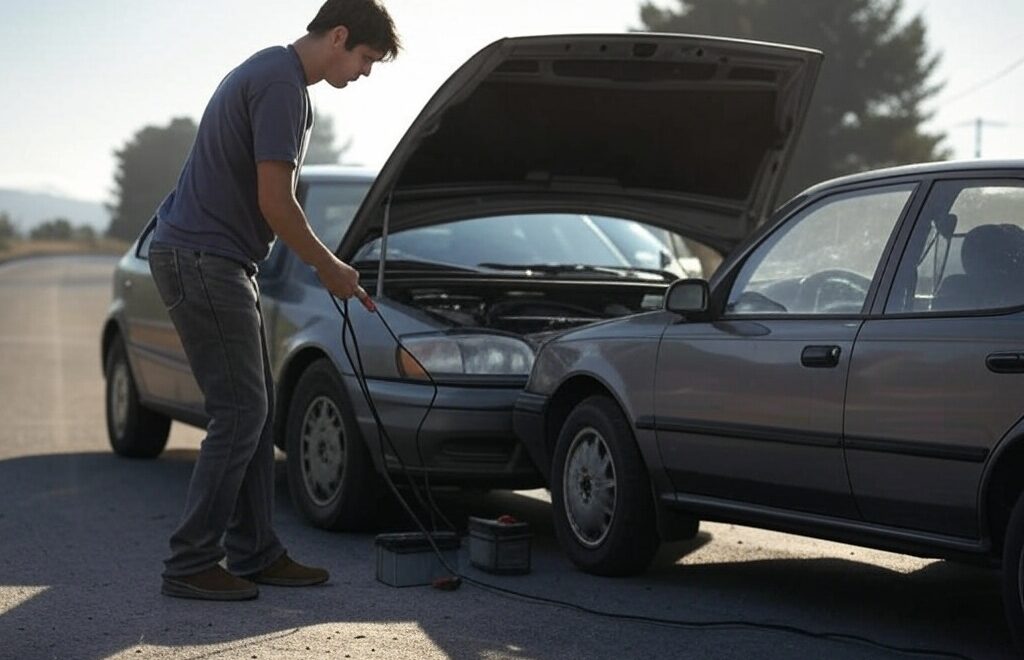
Jump-Starting with Jumper Cables
Use a donor vehicle with a charged 12-volt battery. Follow these steps precisely:
- Position Vehicles: Park the donor car nose-to-nose with the dead car, 1–2 feet apart, ensuring they don’t touch.
- Prepare Vehicles: Turn off both engines, set transmissions to Park (or Neutral for manuals), engage parking brakes, and disable all accessories.
- Locate Batteries: Open hoods, identify positive (+) and negative (–) terminals, and clean terminals if corroded.
- Connect Red Cable to Dead Battery: Attach one red clamp to the dead battery’s positive (+) terminal securely.
- Connect Red Cable to Donor Battery: Attach the other red clamp to the donor battery’s positive (+) terminal.
- Connect Black Cable to Donor Battery: Attach one black clamp to the donor battery’s negative (–) terminal.
- Ground Black Cable on Dead Car: Attach the other black clamp to an unpainted metal surface (e.g., engine bolt) on the dead car, away from the battery to reduce spark risk.
- Start Donor Vehicle: Start the donor car and let it idle for 1–2 minutes, optionally revving to 1500–2000 RPM.
- Start Dead Vehicle: Attempt to start the dead car. If it doesn’t start, wait 30 seconds and try again. If it fails after a few attempts, seek professional help.
- Disconnect Cables: With the dead car running, remove cables in reverse order: black clamp from dead car’s ground, black clamp from donor’s negative, red clamp from donor’s positive, red clamp from dead car’s positive. Avoid clamp contact.
- Close Hoods: Ensure the jumped car runs smoothly, then close hoods and remove safety gear.
Jump-Starting with a Portable Jump Starter
A portable jump starter eliminates the need for a donor vehicle. Follow these steps:
- Prepare Vehicle and Device: Place the jump starter on a stable surface, ensure the car is off, in Park/Neutral, with the parking brake on, and check the jump starter’s charge level.
- Connect Red Clamp: Attach the jump starter’s red clamp to the battery’s positive (+) terminal.
- Connect Black Clamp: Attach the black clamp to the battery’s negative (–) terminal or an unpainted engine ground, per the device’s instructions.
- Activate Jump Starter: Turn on the jump starter or press its boost button, confirming a safe connection (e.g., green light).
- Start Car: Attempt to start the car. If it fails, wait 30–60 seconds and try again, up to 3–5 times. If unsuccessful, seek professional help.
- Disconnect Jump Starter: Turn off the jump starter, remove the black clamp, then the red clamp, avoiding contact between clamps or metal surfaces.
- Close Hood: Store the jump starter and keep the car running to charge the battery.
After the Jump-Start
A successful jump-start is only the first step. Take these actions to prevent future issues:
- Charge the Battery: Drive for 20–30 minutes or let the car idle to allow the alternator to recharge the battery. Driving is more effective than idling.
- Avoid Immediate Shutdown: Do not turn off the engine until the battery has recharged to avoid needing another jump.
- Test the Battery and Charging System: Have the battery and alternator tested at an auto shop to identify the cause of the failure.
- Replace Battery if Needed: If the battery is old (3–5+ years) or fails testing, replace it to prevent future issues.
- Monitor Performance: Watch for warning signs like dimming lights or a persistent battery light, indicating alternator or electrical issues.
- Prevent Future Failures: Identify the cause (e.g., lights left on, old battery) and maintain the battery by keeping terminals clean and driving regularly, especially in cold weather.
Conclusion
Jump-starting a car is a valuable skill that can get you back on the road quickly. By prioritizing safety, following the correct connection sequence, and addressing the battery’s condition afterward, you can minimize risks and prevent future breakdowns. Keep jumper cables or a portable jump starter in your vehicle for emergencies, and always consult your owner’s manual for model-specific guidance.